Description
3-D printing is method of object fabrication that uses extruded materials (plastic, metal, etc.) to produce a 3-dimensional item. It is often used for prototyping and small-scale production, largely since it can yield fairly complex designs in only a matter of hours. The software used to work with these machines are known as CAD software, and often use the (quite old) .STL format for export, although alternatives (like 3MF & AMF) have since been developed. Popular tools include Google/Trimble SketchUp, Autodesk 123d and Inventor, which I have years of experience in the former. 3-D printers use an electrically heated nozzle (the extruder) to melt the material (filament) onto a flat, often heated bed. Generally, these use the Cartesian system (x, y, z movement) for their printing mechanisms, but some designs use the delta system, where the extruder is attached to three separate arms.
The best thing about this equipment is how it can produce objects from scratch. You could make food, artificial body parts, or with very fine movement, make intrinsically tiny objects smaller than a common surface-mount resistor or .
The best thing about this equipment is how it can produce objects from scratch. You could make food, artificial body parts, or with very fine movement, make intrinsically tiny objects smaller than a common surface-mount resistor or .
Making 3D Designs
|
Above is a sketch of the project I'm doing. The object I've decided to make is a coin holder, but it's able to up to 200 quarters, or have 50 dimes, pennies, nickels, and quarters each in their own divot.
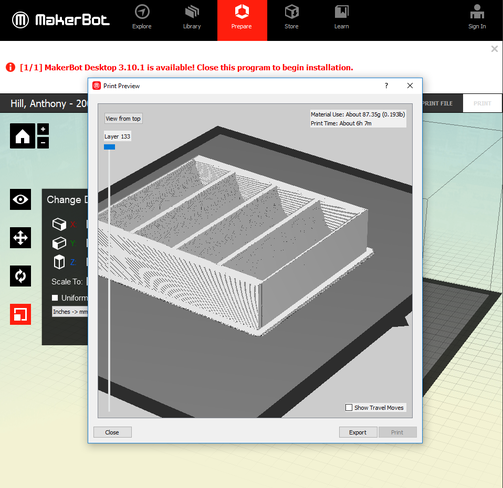
Here the model has been exported into Makerbot's printer control software. Here you can somewhat see what the model should like, layer by layer. It should also take about six hours to print.
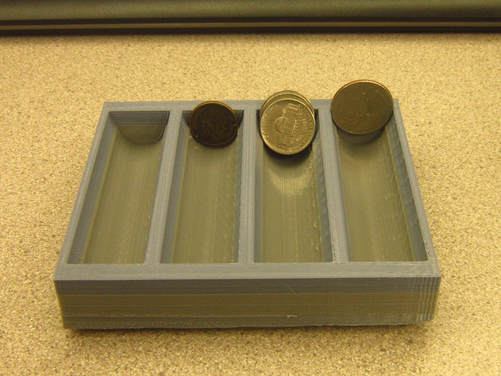
Six hours later, we have the finished object. It's actually the second attempt, since the printer ran out of filament halfway through. Other than the grey-green section in the middle, it's perfectly functional, and is able to hold a few coins in the divots.
|
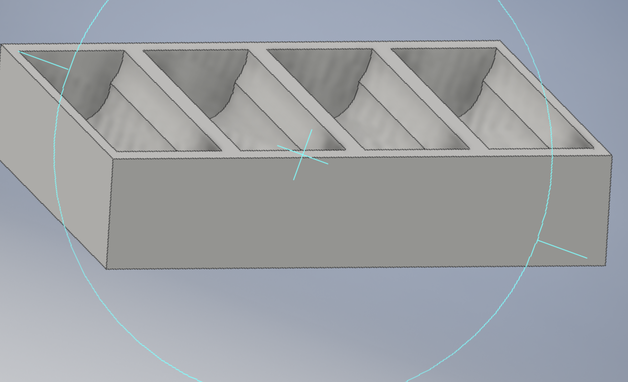
This is my design of the coin holder in Autodesk Inventor, a professional (and expensive) 3-d modelling tool. I'm using two coin sizes (penny and quarter) that cut into each-other to let it hold up to $50 in coins. As long as the print doesn't cool down and reshape itself, it should squeeze those two tightly, allowing one to use them like bookends for the other coins.
Here is the 3-d printer warming up the filament, preparing to layer melted plastic together. It's motions are comparable to someone frosting a cake...only the cake is just layers upon layers of frosting, which has to cool off quickly so it can retain it's shape.
Summary
Like the last printing exercise, I didn't learn much...but this project, at least in the way I implemented it, did require a bit of pre-thinking in terms of "...how do I retain the coins in the holder?" Now, I think if I were to attempt the project again, I would do three things: 1) Add a lid to make it portable; 2) Adjust the dimensions for presidential dollar coins; 3) Make sure the printer has enough filament to get one solid color for all parts. I think that the current design would likely do it's best as a tray for peppermints or other tiny candies, due to there round shape and minuscule size. |
